Building a Jar of Memories IoT Button with Python, Twilio & AWS
How to send favorite photo memories via text with a click of a far-away button

Let me preface this by first saying we do not have any pets or plants. My wife works from home frequently, and as a result, I receive phone calls periodically throughout the day for ‘chit-chat.’ I am always happy to participate in this ‘chit-chat,’ but I often need to tell her that it interferes with meetings while I am at work. To help smooth over the disappointment whenever I need to decline the call, I decided to make her something. This decision happened to come around Valentine’s Day last year, so I went all in on a geeky-romantic something. This was early on in my quest to learn Python, a quest I am still on today, but I decided the something I would make her would somehow incorporate Python.
After stumbling across a random Reddit post about watering plants with a raspberry pi, I somehow was inspired to do something similar, only with an AWS IoT button instead of the Raspberry Pi. What I ultimately decided on was a button that would send a photo of the two of us to her via text message. I wanted her to be able to trigger the text message herself, so anytime I didn’t pick up her ‘chit-chat’ call she could go to the kitchen and push the button to receive a photo that made her smile. The button has been a huge success, so I’ve decided to turn it into a blog post in case any geeky-romantics out there want build on this idea!
Project Overview
We will be creating our script in Python using a virtual environment. For those that have not worked with Twilio or AWS before, you’ll need to set up an account for each. Most of these accounts give you free credits to use, but even after those run out I am paying less than $2/month to maintain the project (assuming my wife doesn’t get super nostalgic or chatty!). You also need to get your hands on a 1st generation AWS IoT button off Amazon.
Requirements
- Homebrew
- Python 3.x
- Pyenv
- Twilio Account
- AWS Account
- 1st Generation AWS IoT Button
- 20+ Favorite JPG Photos
Python Script
Installing python with pyenv
Pyenv is a neat little trick that helps to manage different projects with different dependencies targeting different Python versions on your local machine. In other words, pyenv allows you to install different versions of Python local to a directory. We will install pyenv using homebrew. If you do not have a mac, then follow instructions here.
Installing pyenv using homebrew on macOS
$ brew install pyenvInstalling python using pyenv
We need to install python with pyenv install 3.6.6 — if we don’t, we’ll be using the systems python, which is something we don’t want because we don’t have control over that one. We always want to use the pyenv one.
$ pyenv install 3.6.8We also need to install it at the global level to make sure our shell knows we want to use pyenv python and not the system one. We are telling the system which python to use as a default because there are many python versions floating around inside your computer.
$ pyenv global 3.6.6Using a virtual environment
A virtual environment is a copy of the Python interpreter into which you can install packages privately, without affecting the global Python interpreter installed in your system. Your future self will thank you for using a virtual environment whenever possible. It helps to keep code contained and make it more replicable since all the dependencies and site packages are in one place. People set up virtual environments numerous ways, but here are the commands I personally follow:
Creating a new project folder
Let’s call ours memory_jar:
$ mkdir memory_jarInstalling python 3.6.6 with pyenv
Navigate to the folder we just created and change Python to Python 3.6.6. Then verify it is the correct version with the — version command.
$ cd memory_jar
$ pyenv shell 3.6.6
$ python — version
Creating the virtual environment
We are going to call our virtual environment venv. The -m venv option runs the venv package from the standard library as a standalone script, passing the desired name as an argument.
We will create a virtual environment inside the memory_jar directory. Again, you’ll see around the internet that most people use venv as the virtual environment folder name, but feel free to name it whatever. Make sure your current directory is set to memory_jar and run this command.
$ python -m venv venvNow, we need to activate the virtual environment. To do so, run the following command:
$ source venv/bin/activateGreat! Now we are all set up. Make sure you always activate your virtual environment before making any changes to our code, or else you will run into some errors.
Installing modules & packages
Again, the beauty of the virtual environment is that we can install all packages and dependencies in one place, making it easy to share and update. We will be using pip to get the packages we want.
Pip is a package management system used to install and manage software packages written in Python. Since we are using Python 3.6.6, we don’t need to call pip3 since our environment is already using Python 3. Your terminal will tell you if the packages were successfully installed.
Downloading a Package
Downloading a package is very easy with pip. Simply go to your terminal and make sure you are in your virtual environment, then tell pip to download the package you want by typing the following:
$ pip install <package>Now, let’s install the Twilio package.
(venv) $ pip install twilioStarting our script
Let’s go ahead and create our script file which we will call jar_button.py:
(venv) $ touch jar_button.pyThis will be the script we edit in the following sections.
Authenticating with Twilio
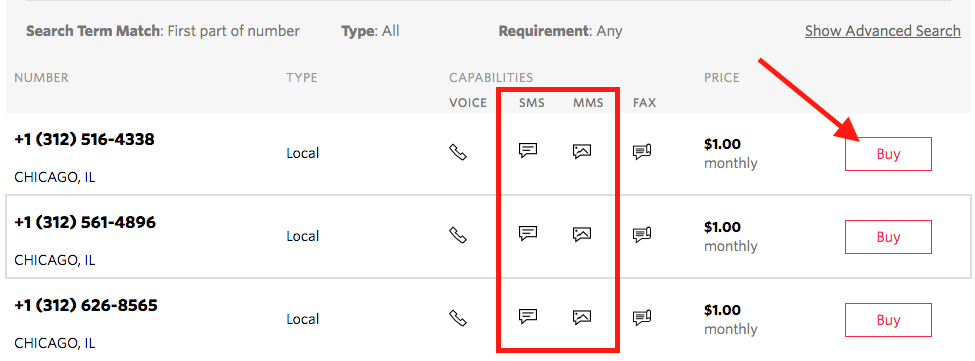
If you have not already signed up for Twilio and purchased a phone number, please do so now. Make sure to get an account that sends MMS, since we plan to send a photo text message.
In your Twilio console, if you go to your dashboard, you will see your Account Sid and Auth Token.

Copy and paste these into your jar_button.py file and replace the account_sid and auth_token with your unique values. Your code should look like this:
import twilio
from twilio.rest import Client
# Your Account Sid and Auth Token from twilio.com/console
account_sid = ‘ACXXXXXXXXXXXXXXXXXXXXXXXXXXXXXXXX’
auth_token = ‘your_auth_token’
We can now connect to Twilio with the following:
# connect to Twilio
client = Client(account_sid, auth_token)
At this point we are ready to send text messages. We will be making an HTTP POST to Twilio’s Message resource. The Twilio library we imported makes it easy for us to create a new instance of the message resource where we include the To, From_ and Body parameters of our message.
Want to test just a simple text? Add in the phone number you want to receive the text to the to variable and update the from_ variable to be your Twilio account phone number. Keep in mind that both of these parameters must use E.164 formatting (+ and a country code, e.g., +16175551212).
We also need to include the body parameter, which contains the content of the SMS we’re going to send.
client.messages.create(
 to=”+YOUR_NUMBER”,
 from_=”+TWILIO_NUMBER”,
 body=”Thanks for reaching in the Jar of Memories!”)
Go ahead and test the script now to confirm you received the text message. Your jar_button.py script should look like this:
import twilio
from twilio.rest import Client
# Your Account Sid and Auth Token from twilio.com/console
account_sid = ‘ACXXXXXXXXXXXXXXXXXXXXXXXXXXXXXXXX’
auth_token = ‘your_auth_token’
client = Client(account_sid, auth_token)
# send MMS
client.messages.create(
 to="+YOUR_NUMBER",
 from_="+TWILIO_NUMBER",
 body="Thanks for reaching in the Jar of Memories!”)
print(‘Done!’)
Creating a folder for photos
While inside your current working directory, make a new folder where you will drag and drop the photos for now until we are ready to upload them to an S3 bucket:
(venv) $ mkdir photosGo ahead and put all your jpg photos in this folder. I recommend doing this using the GUI. The quickest way to do so is to AirDrop the photos from your phone to your computer and then copy and paste them into the memory_jar/photos folder.
Making a list of photos
This part is a bit tedious but worth it. We basically need to create a list with strings of all our jpg images we plan to pull from. I did this manually and it works fine, but it doesn’t scale to hundreds or thousands of photos, so maybe someone out there has a script to read these in from a folder…
Jump back into your jar_button.py script to create an empty list which we will call memories:
memories = []Now, add in all your file names for each photo. I found it easiest to just use the iPhone default names. Keep in mind that these need to be the same file names you upload to the S3 bucket, so if you want to make them descriptive be my guest. However, I advise keeping it simple. Here is a sample of 10 photos from me:
memories = [
‘IMG_0021.jpg’,
‘IMG_00231.jpg’,
‘IMG_0285.jpg’,
‘IMG_0379.jpg’,
‘IMG_0472.jpg’,
‘IMG_0502.jpg’,
‘IMG_0618.jpg’,
‘IMG_0642.jpg’,
‘IMG_0738.jpg’,
‘IMG_0761.jpg’
]
Selecting a random photo file
Now that we have the list of photos, we want to randomly select one each time the script runs to keep the person receiving the photos on their toes. Since it’s a new instance each time, we won’t be able to prevent the script from guaranteeing the photo has not been sent before, but with enough photos I barely see any overlap. For picking anything random I recommend importing the ‘random’ module and then the random.choice() method:
Make sure you import random at the top of your file:
import randomWe pass in the list of photos to the choice method like so:
random.choice(memories)Let’s then save this into a variable so we can reference it throughout the script. You can print it to confirm it is working properly. Run it a few times to make sure you’re getting a different photo each time:
file = random.choice(memories)
print(file)
Uploading Photo Files to AWS
Configuring an S3 bucket
To send a MMS message (aka photo text), we will pass a new media_url parameter into our Twilio HTTP Post Request. This code tells Twilio where to go to get the media we want to include in the text message. That means it must be a link to a publicly accessible URL. Twilio cannot reach any URLs that are hidden or that require authentication. To create a publicly accessible URL, we are going to store our images in an Amazon S3 Bucket.
Log into your AWS console and within the S3 dashboard choose + Create Bucket:

Give your bucket a descriptive name:
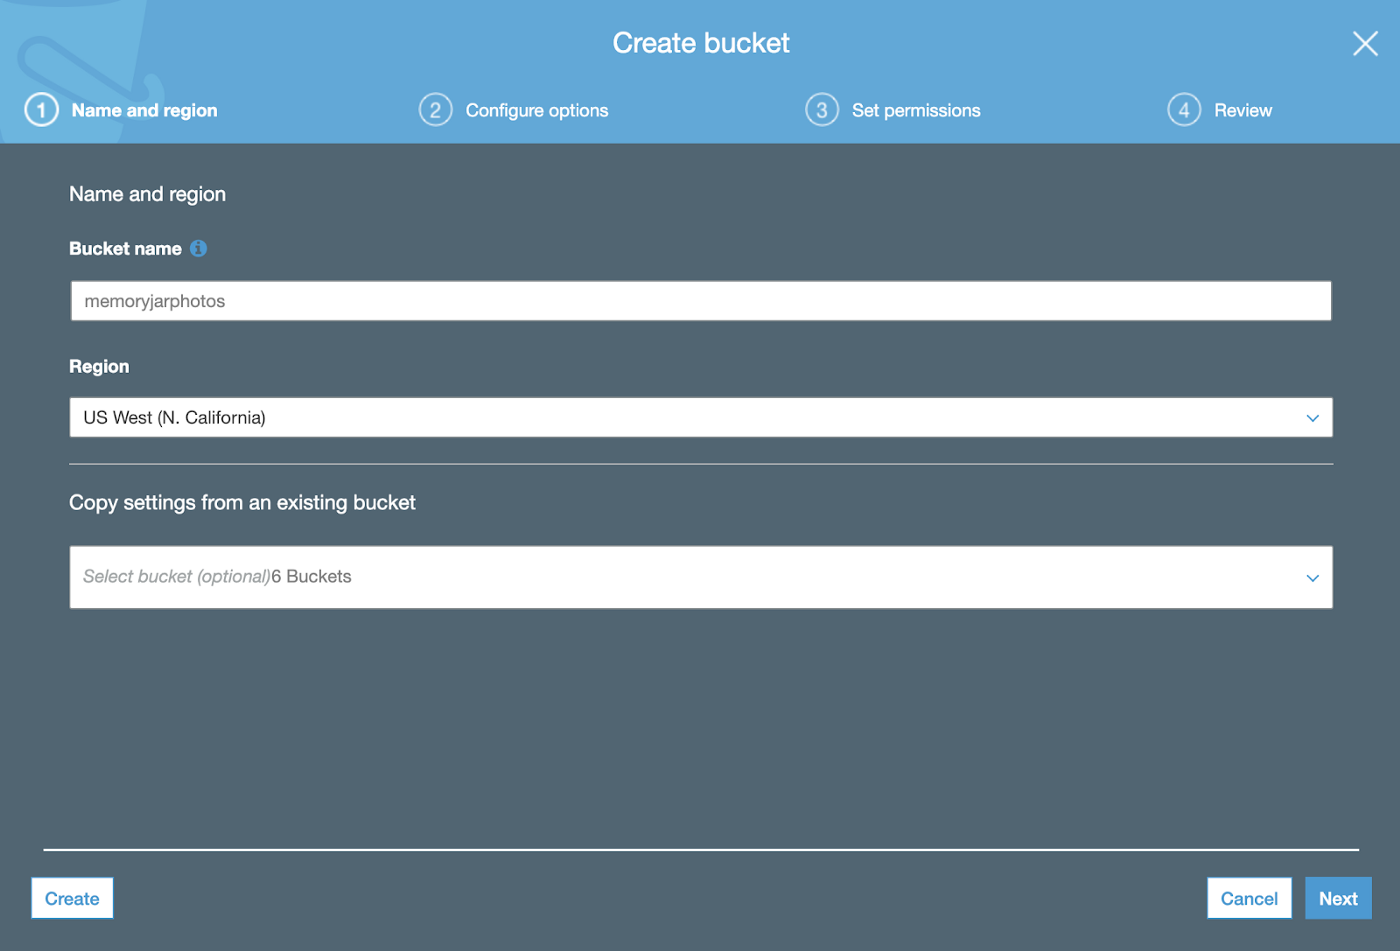
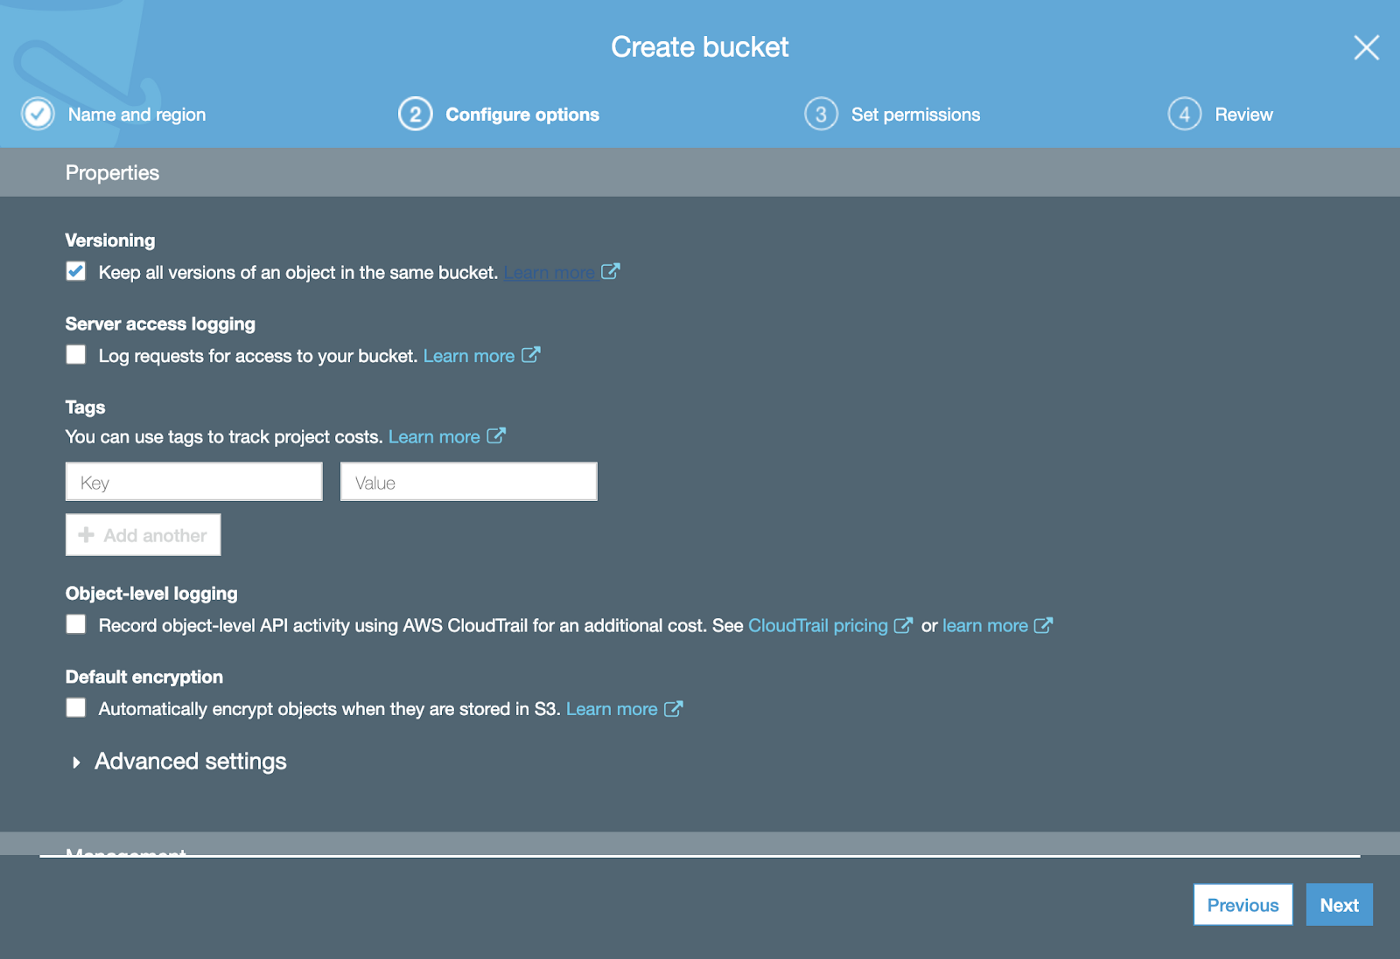
We aren’t going to be doing anything fancy with our bucket besides store photo files, so we don’t need to check any of the boxes.
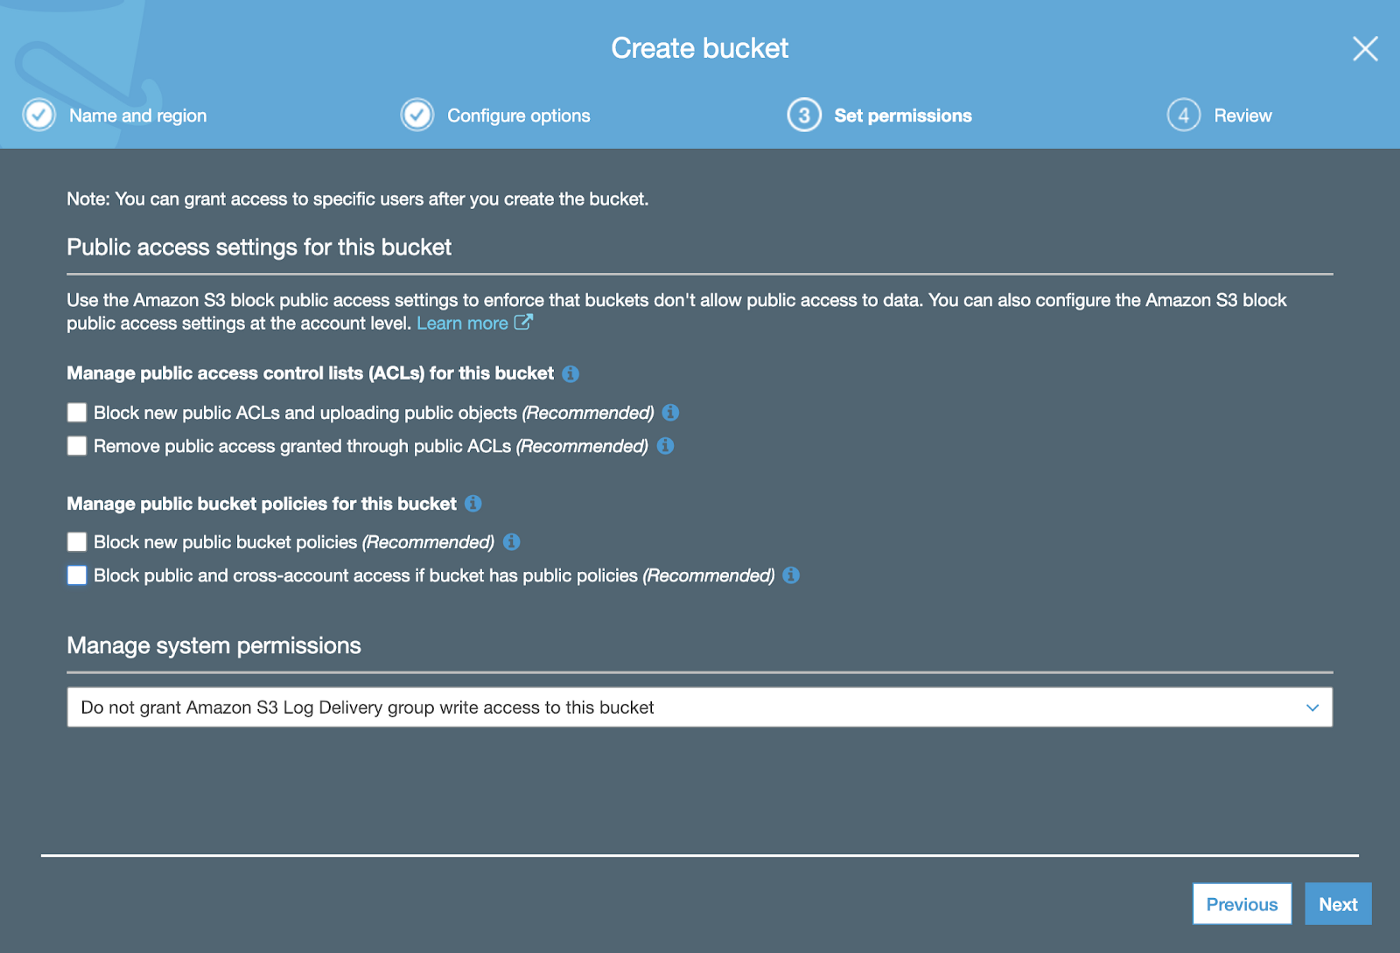
Since we need to make this a public bucket we will uncheck all the boxes that are selected by default:
Review your settings and create the bucket. In your dashboard, click on the bucket you just created. You should see something like the following:
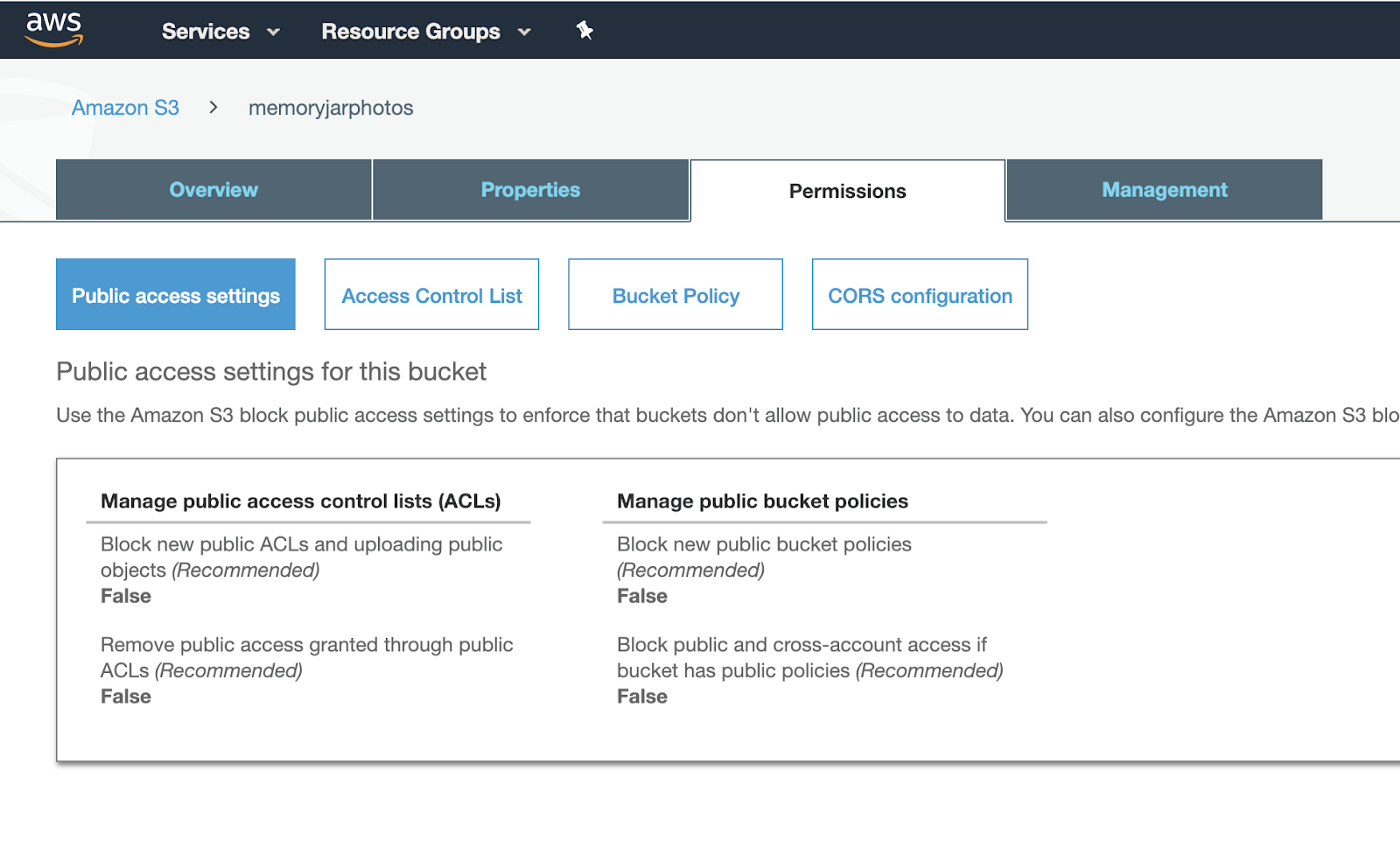
If it is not already, click on the Access Control List to change the bucket to public.
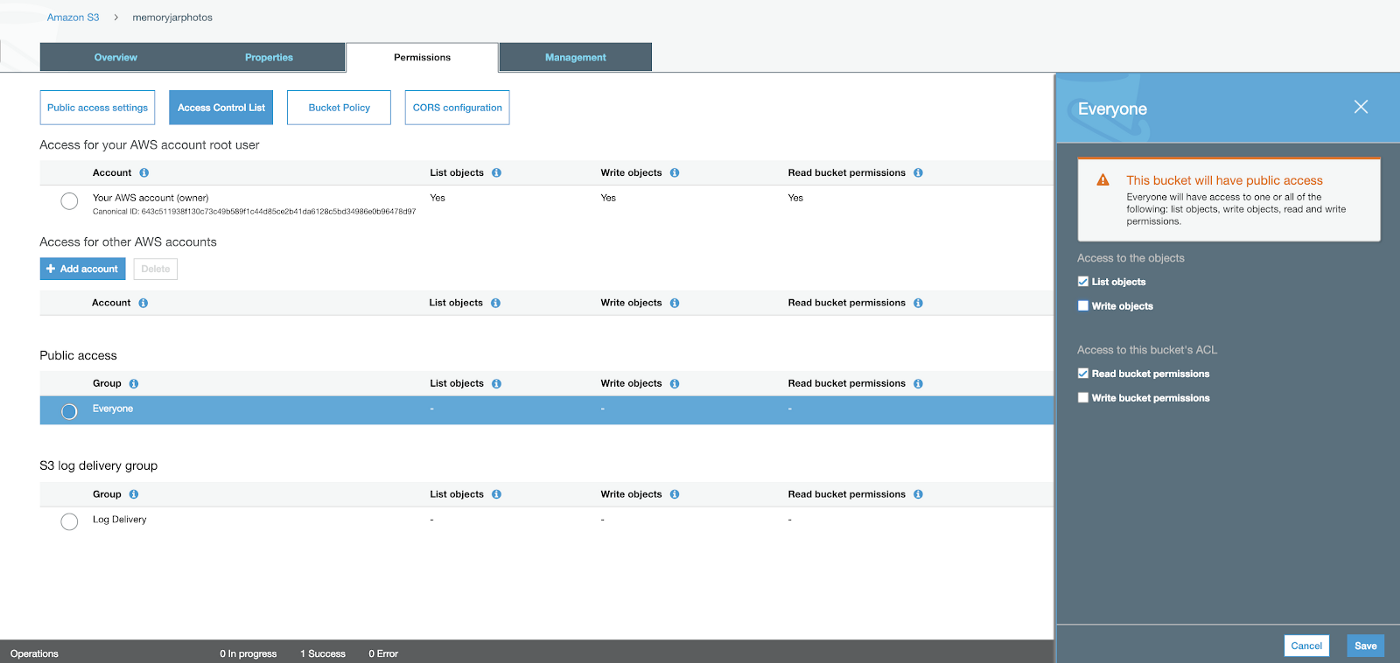
Great. Now you are all set to upload photos to your s3 bucket.
Adding images to S3
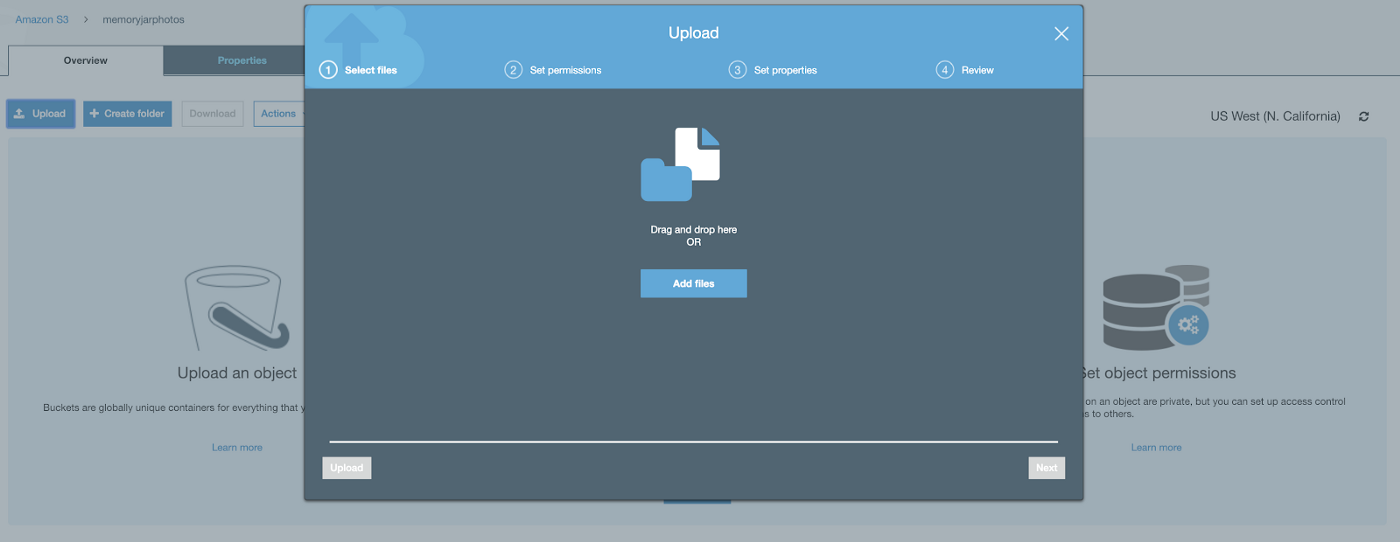
Select your bucket and you will see options to upload photos. Drag your image files from your photos folder with the same .jpg file names used in the Python script, and drop them in the bucket.
Make sure you are granting public access when adding the files:
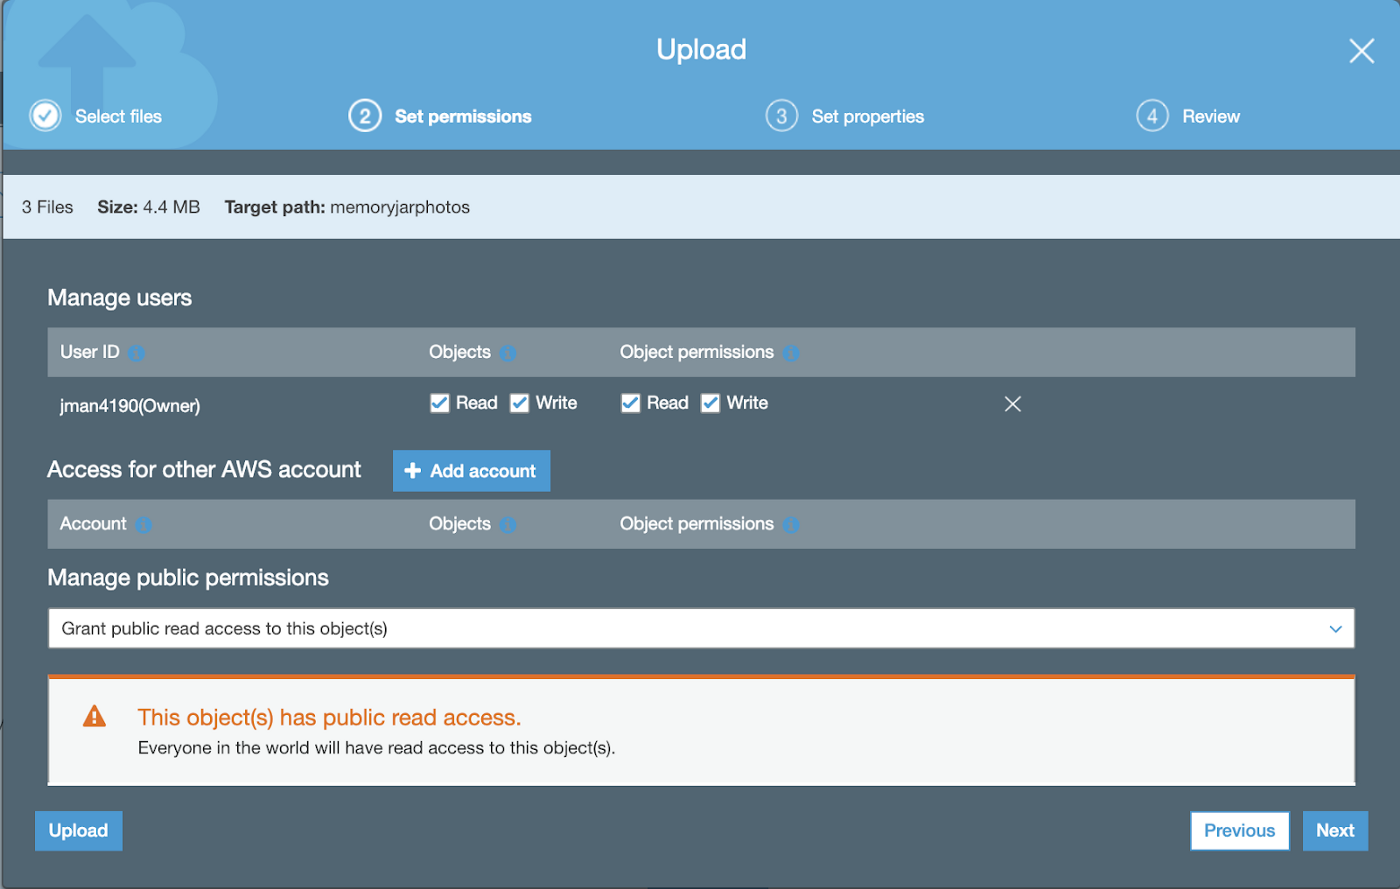
Go through the prompted flow, and when complete, you should see all of your file names in your s3 dashboard.
Sending a photo text message
Now we’re going to update our Python script with the media_url parameter we referenced earlier. First, we need to get the path to our files we just uploaded. If you click on one of the image files in your s3 bucket, you will see the object URL info at the bottom.
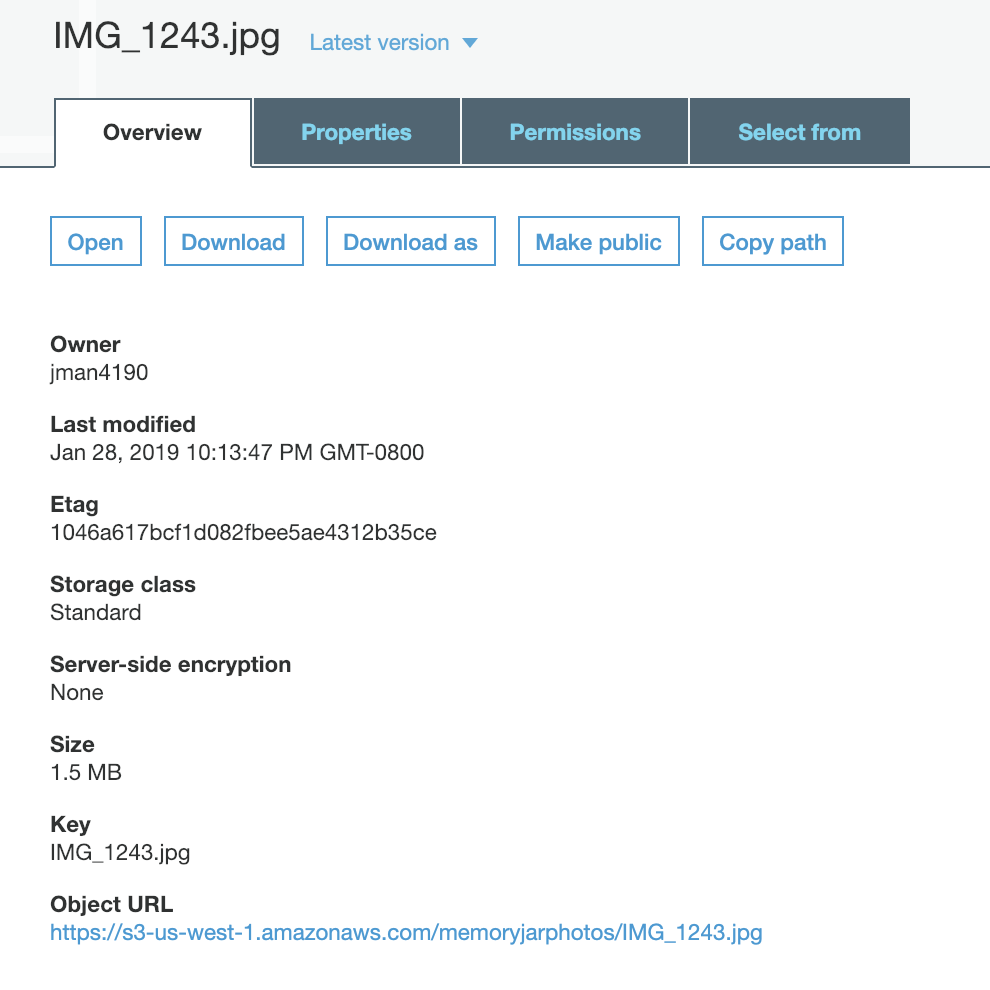
Take the object URL and paste it into your script. Then replace the jpg image filename with %s and reference the file variable which has an image filename saved in it. Save all of this to a media variable:
# this is the url to an image file we’re going to send in the MMS
media = (‘https://s3-us-west-1.amazonaws.com/memoryjarphotos/%s' % file)
Then in the HTTP Post Request, we can set the media_url equal to media:
# send MMS
client.messages.create(
 to="+YOUR_NUMBER",
 from_="+TWILIO_NUMBER",
 body="Thanks for reaching in the Jar of Memories!",
 media_url=media)
Now you’re ready to test your script! Run it in your terminal and see if you receive the photo text message. Double check the to and from_ are correct.
Configuring IoT Button
The AWS IoT button is like a magic wand. You can really use it for anything your mind comes up with. We are going to be using it as a trigger for our AWS Lambda function which will run when the button is pressed.
Amazon does a good job presenting clear steps for configuring the IoT button. You will need a WiFi network connection to complete this step. What is nice about the IoT rules engine is that we can trigger something different with a single-click, double-click and long-press event. For now, we will just focus on the single-click which will run our Python script as an AWS Lambda Function.
Getting started with your new IoT button
Open your package and take your fresh new button out of the box. In your AWS Dashboard, you will have an option to choose to connect an IoT Device.
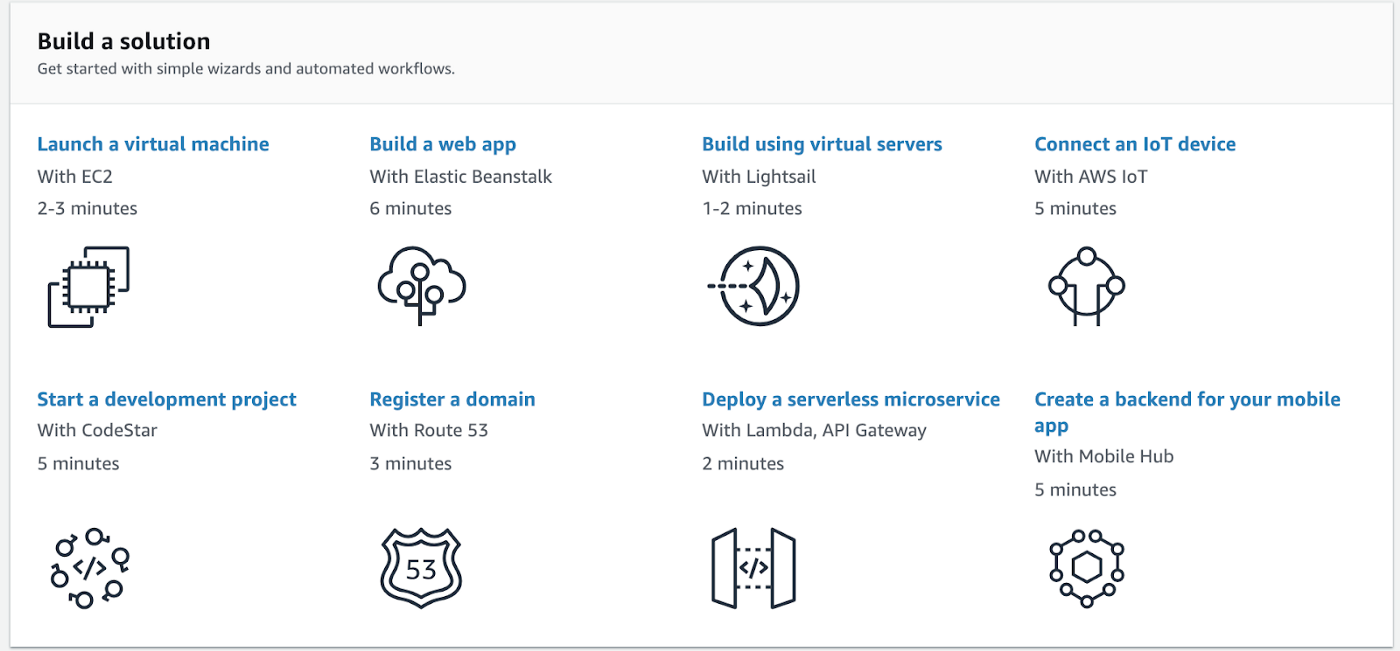
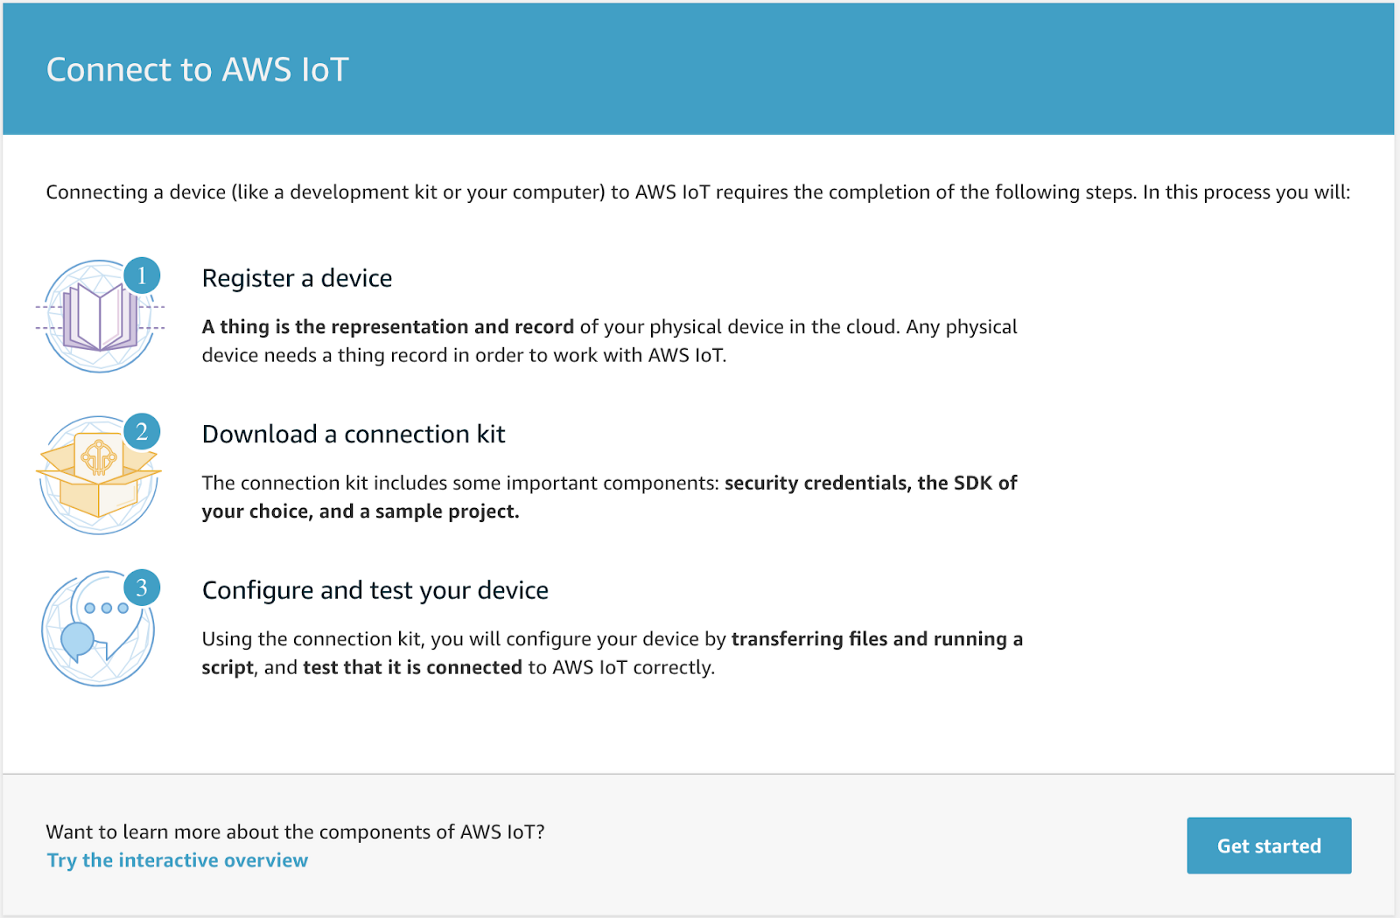
After clicking Connect an IoT device you should see the following screen. Go ahead and click Get started.
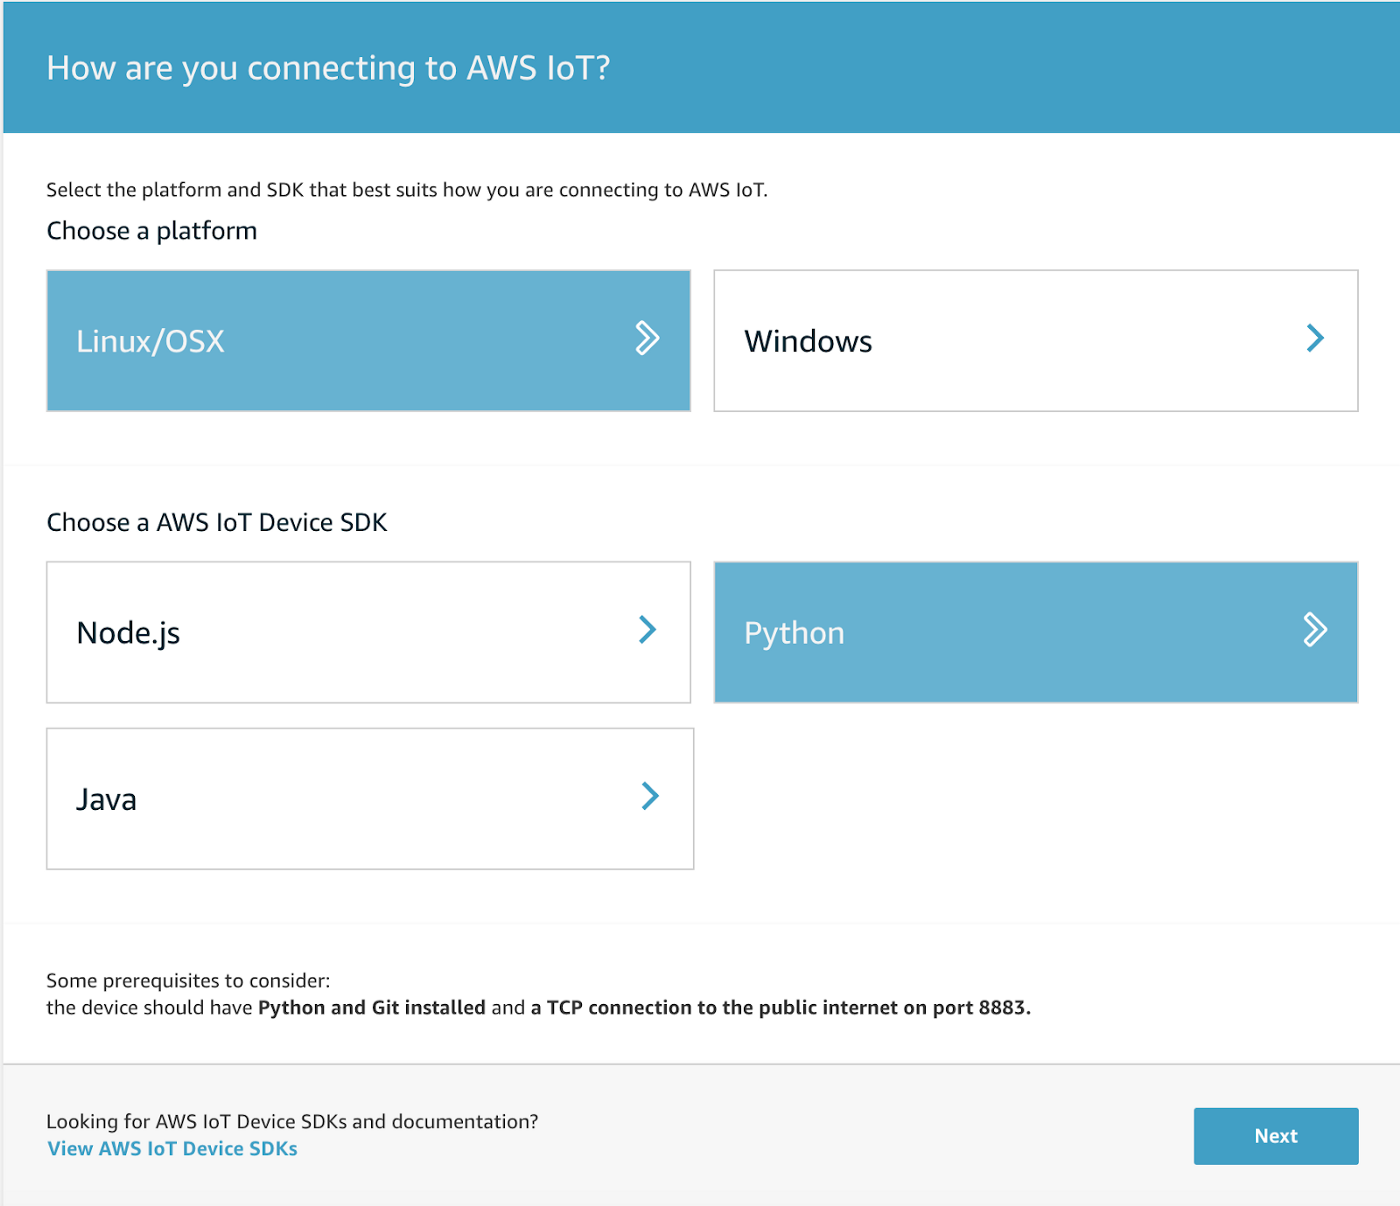
We will be using Linux/OSX as our platform and Python as our IoT Device SDK:
The next screen prompts us to give our button a name. That makes me smile. Feel free to call it whatever you desire:
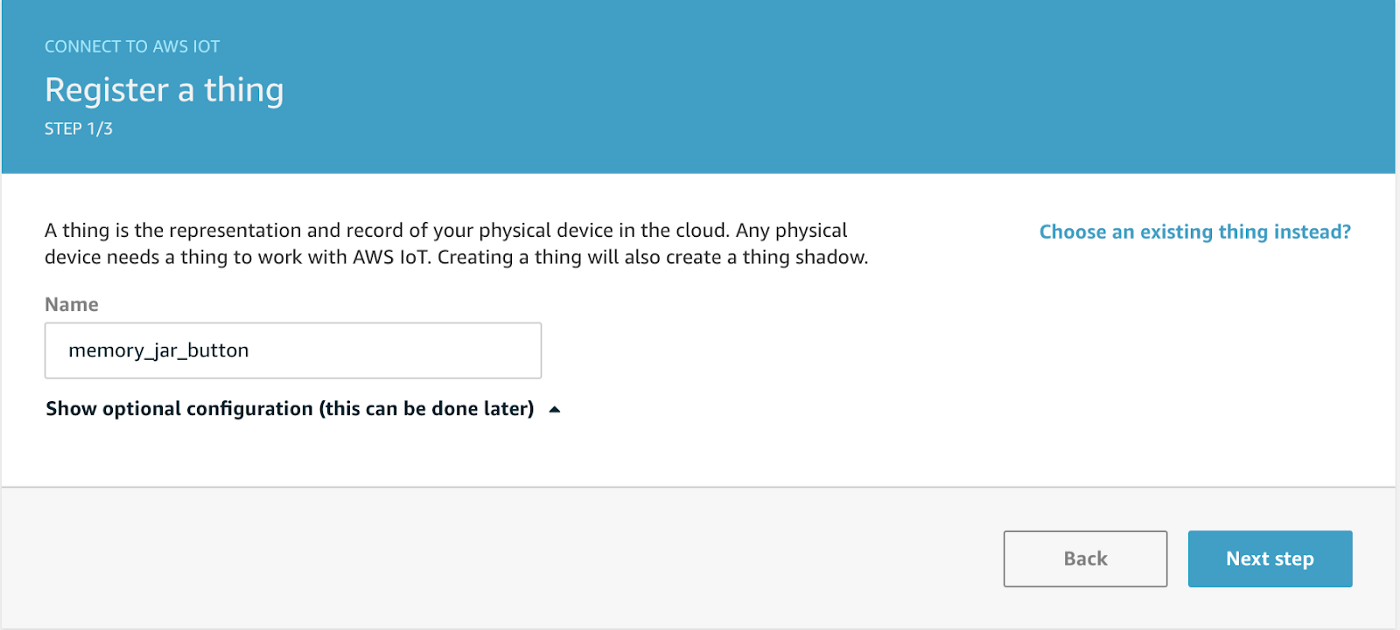
When ready, download the connection kit file by clicking the Linux/OSXblue button.
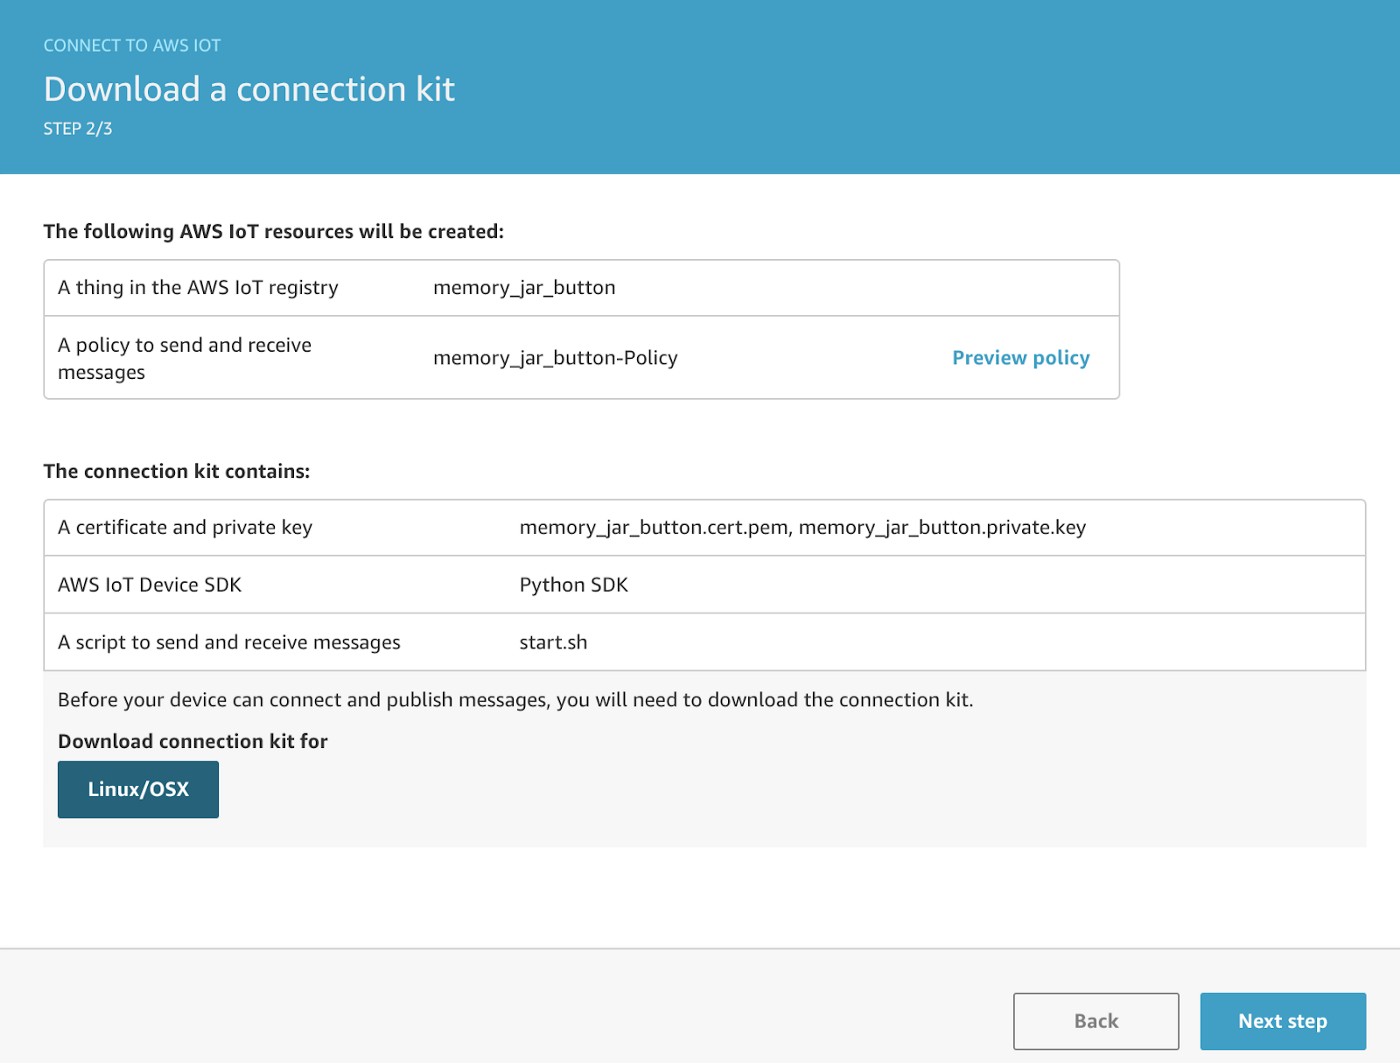
It should go directly to your chrome downloads if you are using chrome. By the way, if you are using chrome, you may find this video funny…
This is your RAM.
— CORSAIR (@CORSAIR) January 23, 2019
And THIS is your RAM on Chrome. pic.twitter.com/zI9DRh53Ng
Back to our regular scheduled programming. You should see the zip file in your downloads.

Right click the download and move the file to your current working directory (/memory_jar). In your directory, copy and paste the bash commands and run them in your terminal one at a time.
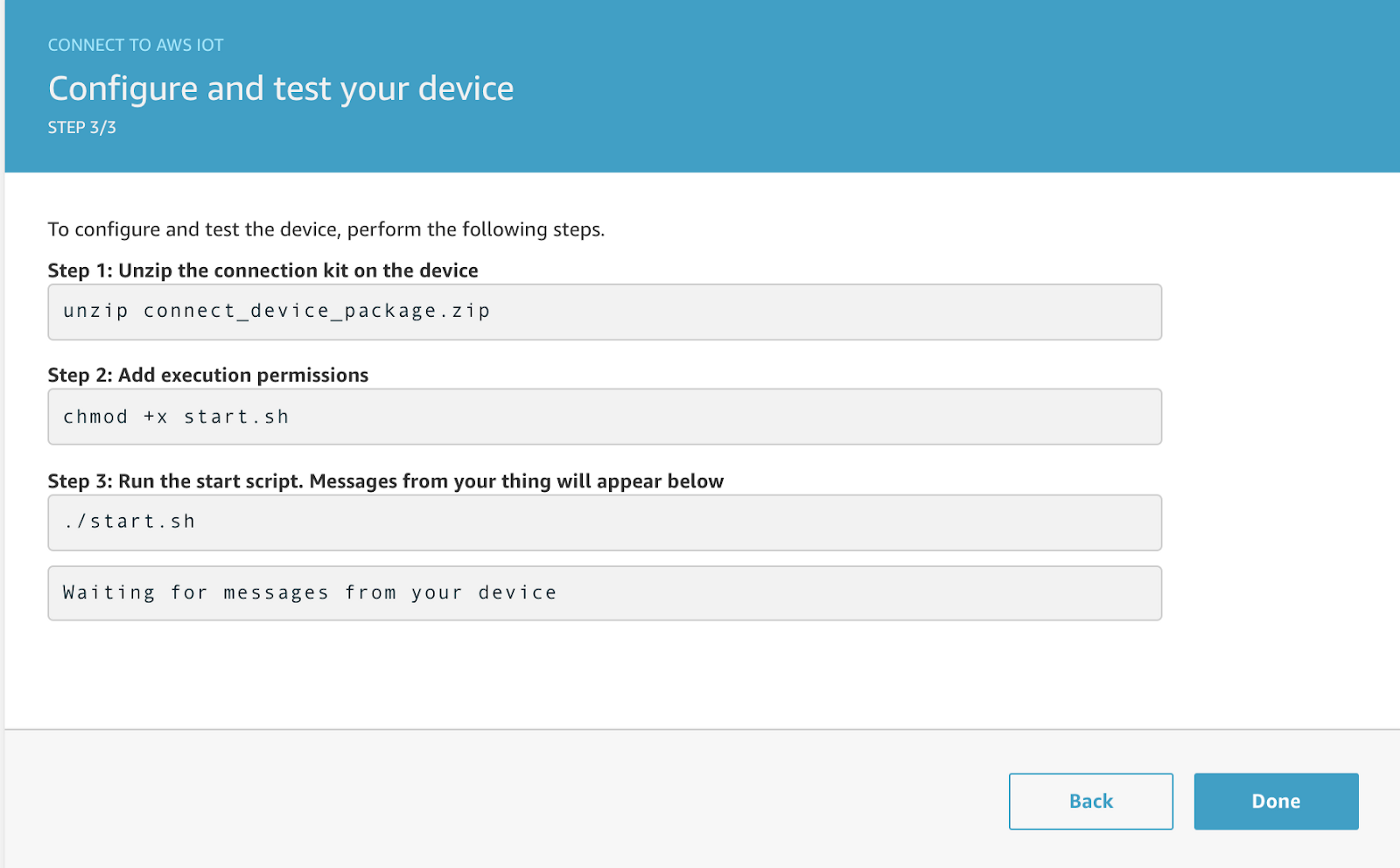
If successful, you should get the following confirmation:
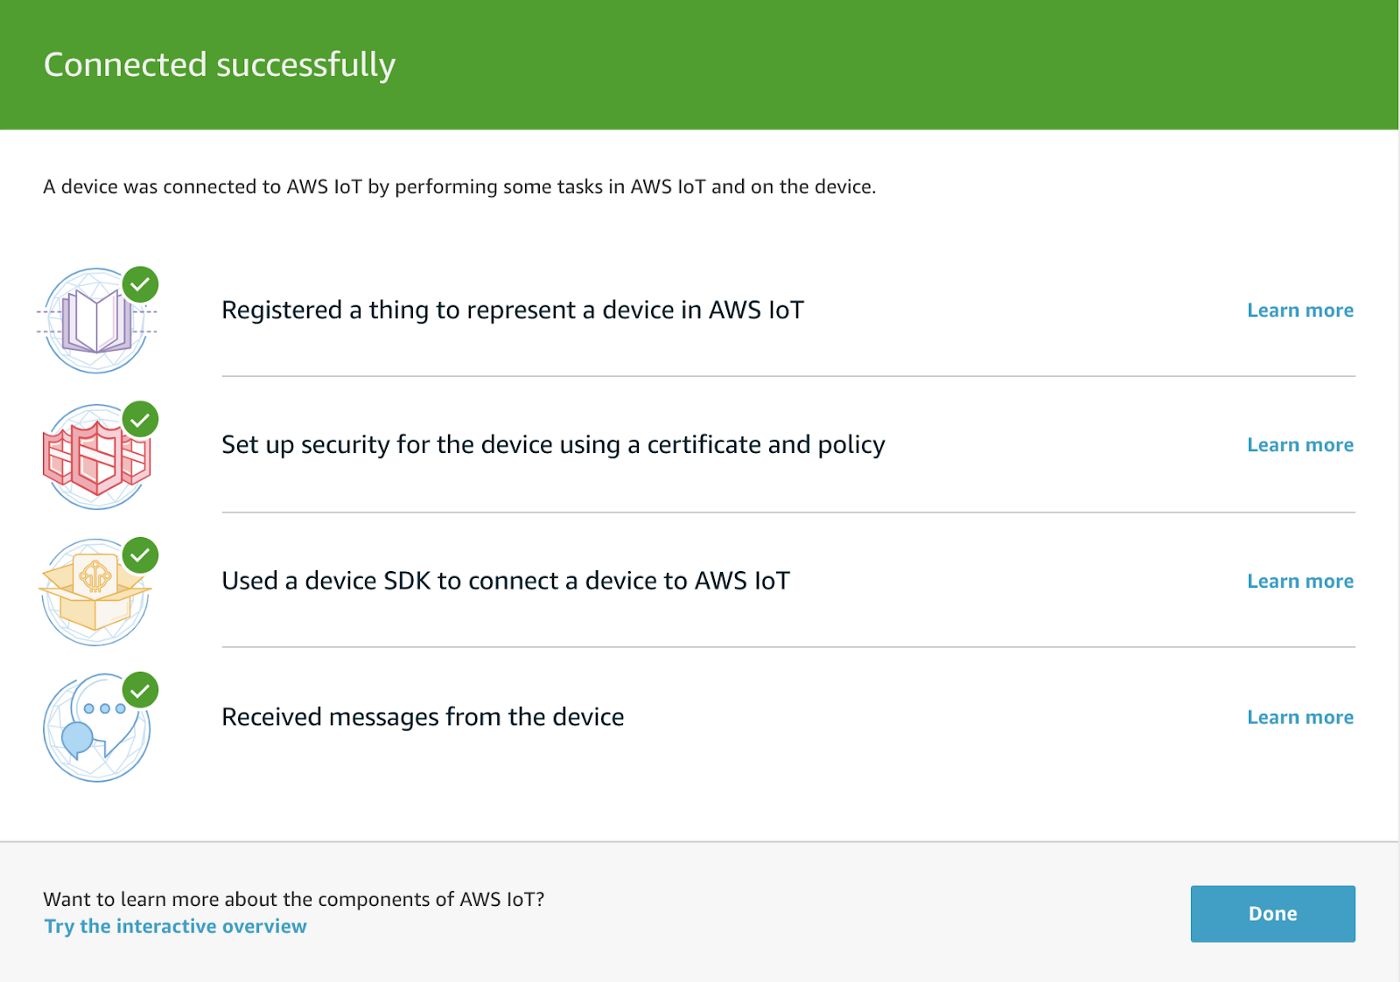
Awesome stuff. If you’ve made it this far, then you are ready to turn your button into a trigger for an AWS Lambda function.
Running script as AWS Lambda Function
Setting up a lambda function
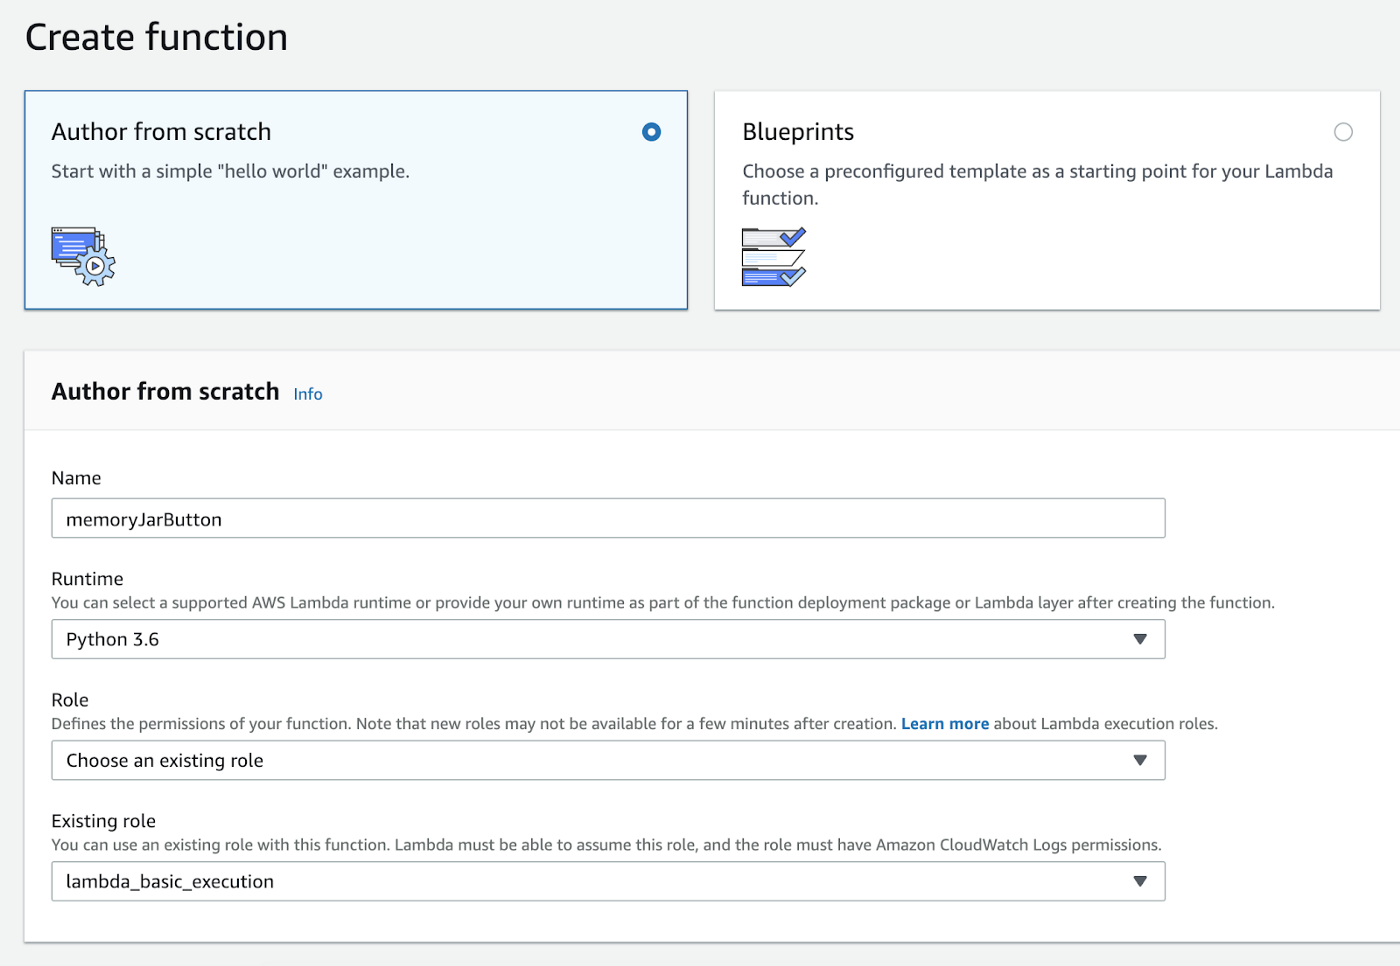
Sign in to AWS and head to the Lambda Management Console. Choose Create Function and select the Author From Scratch option. Give your function a name that is somewhat descriptive then select Python 3.6 for runtime. We will use an existing role for the permissions and that existing role will be the lambda_basic_execution option.
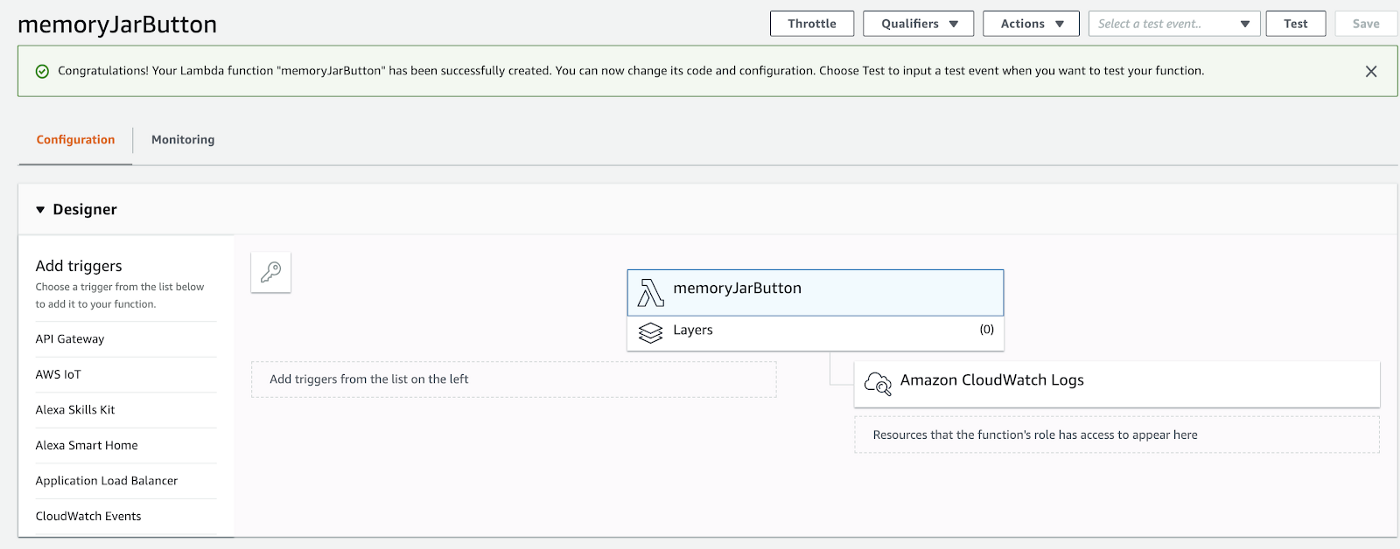
Under the Configuration option we are going to add a trigger from the predefined list on the end. You should see AWS IoT as an option assuming everything was set up right. Make sure you did everything in the same region.
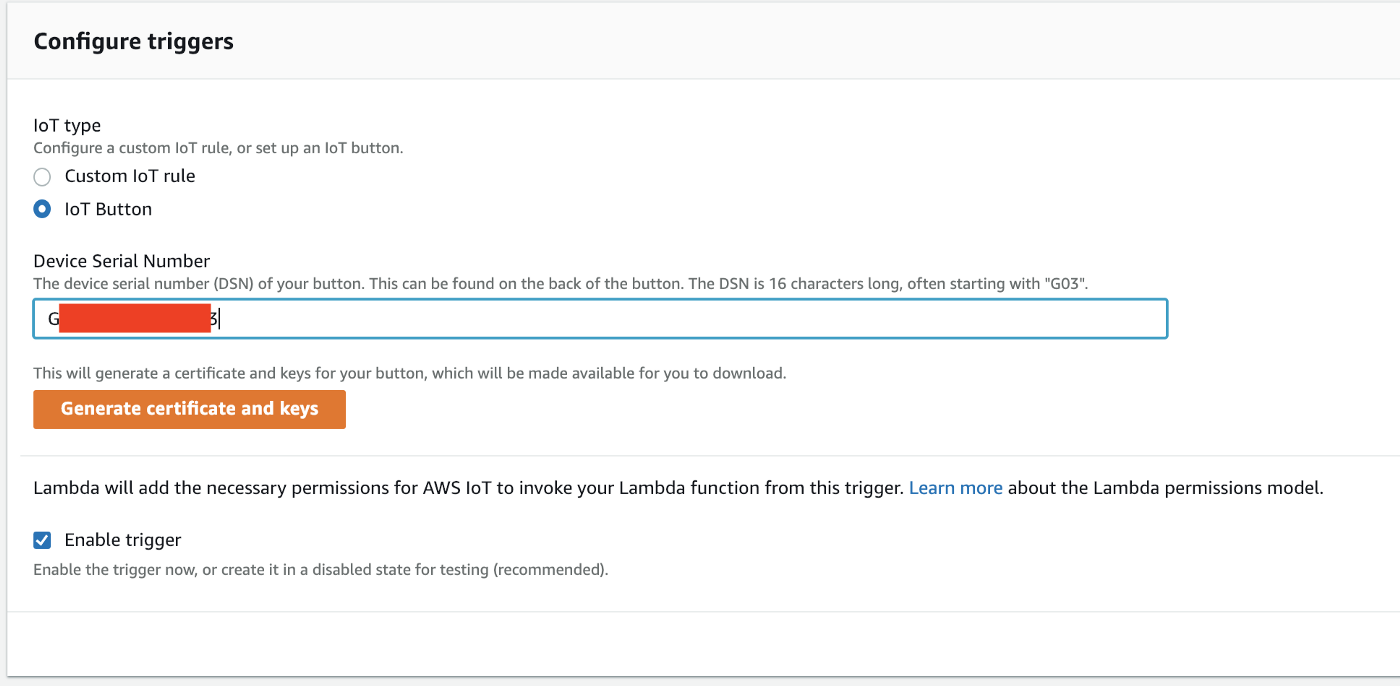
Next, you will need to register the IoT button with your DNS number. You can find it on the backside of the button. Type it in and then click the bright orange button that says Generate certificate and keys.
Amazon is nice enough to provide detailed steps to follow in order to properly configure your IoT button as a trigger. Make sure to download Your certificate PEM and Your private key by clicking on each of the links. Keep track of these files.
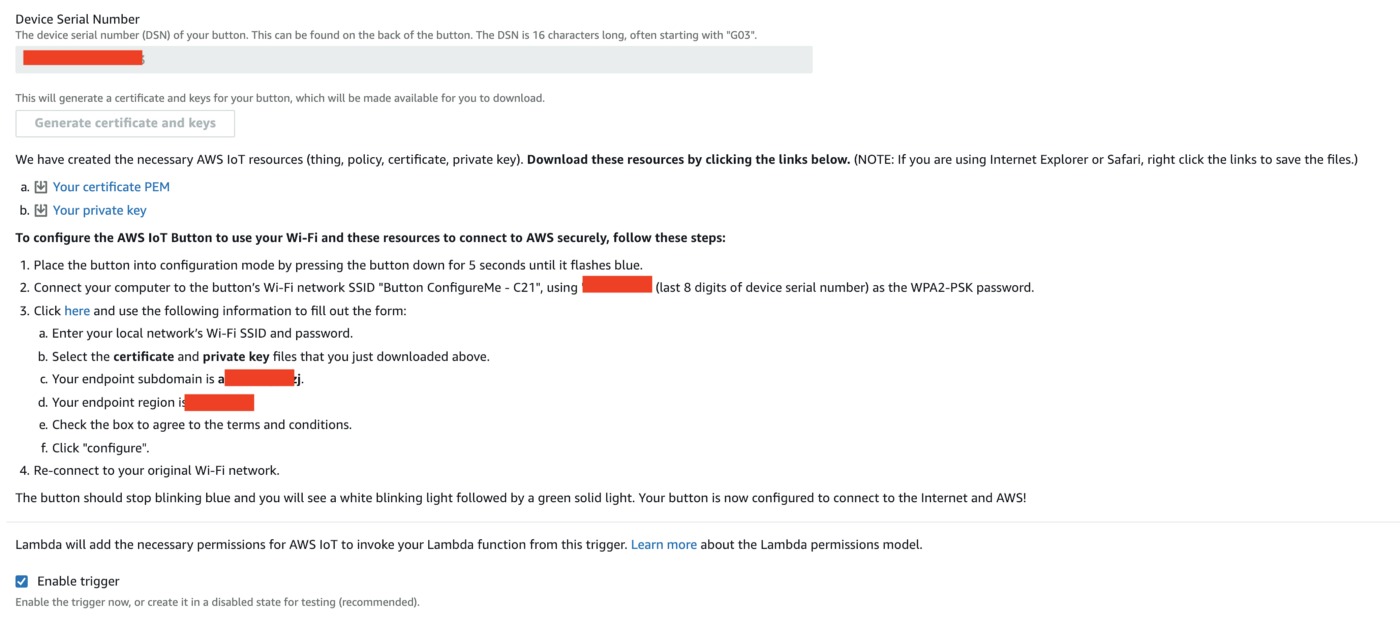
The steps read as follows:
- Place the button into configuration mode by pressing the button down for 5 seconds until it flashes blue
- Connect your computer to the button’s Wi-Fi network SSID “Button ConfigureMe — C21”, using your last 8 digits of your DSN number as the password
- Click the blue link and use the info Amazon provides to fill out the form. It should look like this:
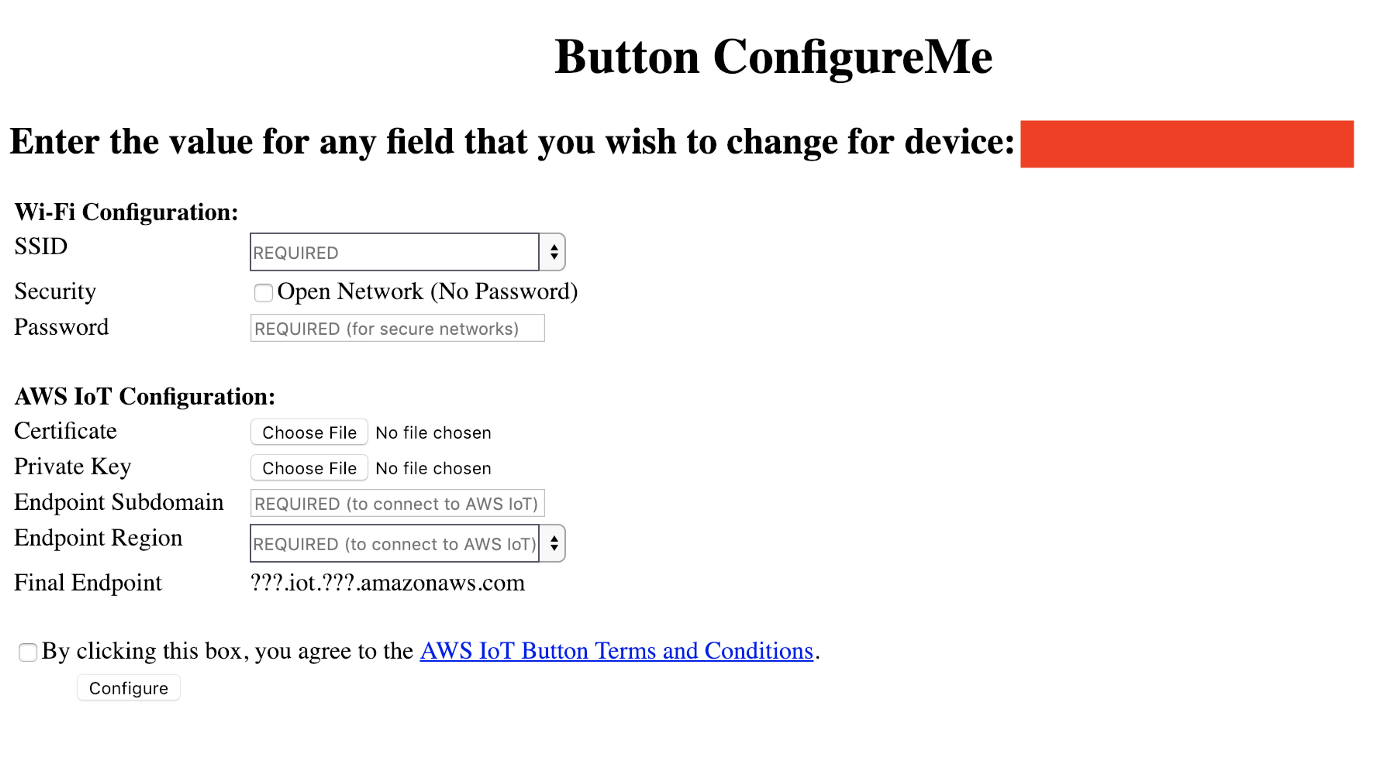
Amazon will provide your endpoint subdomain and endpoint region. Check the box to agree to the terms and conditions (assuming you agree) and then click configure. You’ll be taken to this empty page:

Dandy! Onto the next.
Trigger script with IoT Button
By now you should have your AWS IoT as the trigger for your function. The final step will be uploading our Python script to AWS.

Uploading Python File as a Lambda Function
Next, we are going to upload our function code that we worked on previously. But, before we do that, let’s go back to our script and add one more edit to make so AWS can handle everything on its end.
We need to select our code and turn it into an AWS Lambda function by adding this line:
def lambda_handler(event, context):With all the code below it selected, tab over once. Your final code should look like this:
import twilio
from twilio.rest import Client
import random
# Your Account Sid and Auth Token from twilio.com/console
account_sid = “AXXXXXXXXXXXXXXXXXXXXXXXXXX”
auth_token = “YOUR_AUTH_TOKEN”
client = Client(account_sid, auth_token)
def lambda_handler(event, context):
 # update with new file names here after adding them to s3 bucket
 memories = [‘IMG_0021.jpg’,
 ‘IMG_00231.jpg’,
 ‘IMG_0285.jpg’,
 ‘IMG_0379.jpg’,
 ‘IMG_0472.jpg’,
 ‘IMG_0502.jpg’,
 ‘IMG_0618.jpg’,
 ‘IMG_0642.jpg’,
 ‘IMG_0738.jpg’,
 ‘IMG_0761.jpg’]
 file = random.choice(memories)
 # this is the URL to an image file we’re going to send in the MMS
 media = (‘https://s3-us-west-1.amazonaws.com/memoryjar/%s' % file)

 # send MMS
 client.messages.create(
 to=”+YOUR_NUMBER”,
 from_=”+TWILIO_NUMBER”,
 body=”Thanks for reaching in the Memory Jar!”,
 media_url=media)
 print(‘Done!’)
Save this final script and make a copy of it to paste in the site-packages folder. Don’t skip this step! I repeat, you need to add a copy of your script to the site-packages folder within your virtual environment so it’s included when you zip everything up.
Uploading a zip file
In the function code section of your dashboard, make sure you have the following selected. We are going to upload a zip file with our script and all of our site packages. It is important that your handler is the name of your function, followed by .lambda_handler.

To zip your files in the terminal, navigate to your virtual environment and run these two lines.
$ cd venv/lib/python3.6/site-packages/
$ zip -r9 ../memory_jar.zip .
The first will change your working directory to the site-packages and the second will create a zip file. Once you’ve zipped the files, you can head back to your AWS function code and upload the file you just zipped. You can now save your function and test the code.

Push button and enjoy
And there you have it. A button that sends photo memories to your phone. If you have any issues, feel free to drop me a line in the comments and I’ll do my best to answer in a timely manner.
Cheers.
